@ List
* 8.5 이미지 업로드하기
** 8.5.1 이미지 선택 기능 구현하기
** 8.5.2 사용자 기본 이미지 설정하기
** 8.5.3 Firebase Storage로 이미지 업로드하기
* 8.6 정리
@ Note
1. react-native-image-picker 라이브러리
$ yarn add react-native-image-picker
$ npx pod-install
- {launchCamera} : 사용할 이미지를 카메라로 바로 촬영할 때 사용
- {launchImageLibrary} : 사진첩에서 이미지 선택할 때 사용
> OS별 callback 로그 값
// iOS
LOG  {"assets": [{"fileName": "F25D0...539.jpg", "fileSize": 242106, "height": 341, "type": "image/jpg", "uri": "file:///Users/...EBE-415CAD01B539.jpg", "width": 512}]}

// Android
LOG  {"assets": [{"base64": "/9j/4AAQSkZJR ... Y3omh//9k=", "fileName": "rn_image_picker_lib_temp_...e1b.jpg", "fileSize": 18179, "height": 500, "type": "image/jpeg", "uri": "file:///data/...7e1b.jpg", "width": 500}]}
2. 유용한 사이트
- 특정 크기를 가진 이미지를 랜덤으로 보여줌 : https://picsum.photos/500
3. Firebase Storage 이미지 업로드 사용법
import storage from '@react-native-firebase/storage';

//업로드할 경로 지정
const reference = storage().ref('/directory/filename.png');

// 파일 저장(uri: 선택한 이미지의 로컬 경로, type: 선택한 이미지의 타입)
if (Platform.OS === 'android') {
  await reference.putString(asset.base64, 'base64', {
    contentType: type,
  });
} else {
  await reference.putFile(uri);
}


// 다운로드할 수 있는(또는 Image를 통해 보여줄 수 있는) URL 생성
const url = await reference.getDownloadURL();
- iOS에서는 uri에서 파일을 불러와서 바로 업로드하고, Android 에서는 putString을 통해 base64로 인코딩된 데이터를 업로드해야 함
4. Javascript 배열 메서드 이해
- pop : 배열의 마지막 요소 제거 후, 제거한 요소 반환
- push : 배열의 마지막에 새로운 요소 추가한 후, 변경된 배열의 길이를 반환
- shift : 배열의 첫 번째 요소 제거 후, 제거한 요소 반환
- unshift : 배열의 첫 번째 자리에 새로운 요소 추가한 후, 변경된 배열의 길이 반환
var arr = [1, 1, 2, 3];

console.log(arr.pop());          // 3

console.log(arr.push("add"));    // 4
console.log(arr);                // [ 1, 1, 2, 'add' ]

console.log(arr.shift());        // 1

console.log(arr.unshift("add")); // 4
console.log(arr);                // [ 'add', 1, 2, 'add']
5. Firebase Storage 권한 설정
- 책을 그대로 따라하다 보면 storage에 파일 등록 시 아래처럼 권한 오류가 발생함
- 해결방법 : https://bocoder.tistory.com/81
WARN Possible Unhandled Promise Rejection (id: 26):
Error: [storage/unauthorized] User is not authorized to perform the desired action.
NativeFirebaseError: [storage/unauthorized] User is not authorized to perform the desired action.

6. loading 상태 시 ActivityIndicator 컴포넌트 사용
(...)
import (...) ActivityIndicator, } from 'react-native';

(...)

{loading ? (
  <ActivityIndicator size={32} color="#6200ee" style={styles.spinner} />
) : (

  (...)

)}
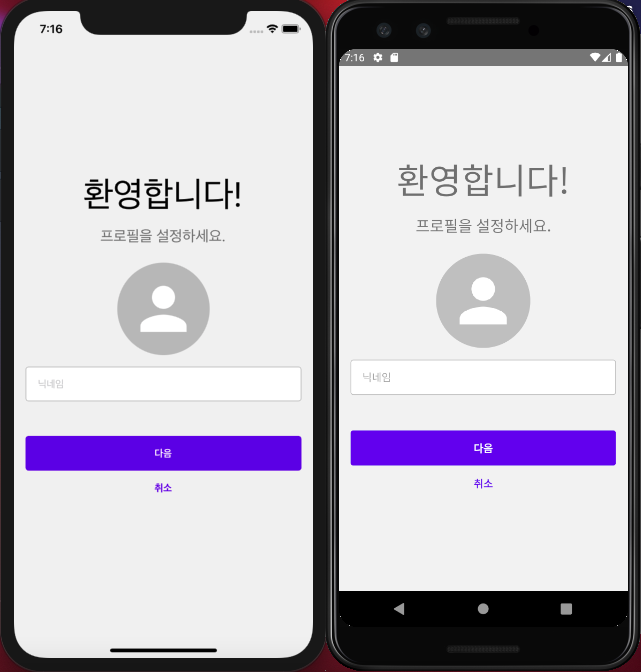
@ Result


@ Git
- https://github.com/eunbok-bocoder/PublicGalleryBocoder/commits/main
# Source tree


# android > app > src > main > AndroidManifest.xml
<manifest xmlns:android="http://schemas.android.com/apk/res/android"
  package="com.publicgallerybocoder">

    <uses-permission android:name="android.permission.INTERNET" />
    <uses-permission android:name="android.permission.READ_EXTERNAL_STORAGE" />
    <uses-permission android:name="android.permission.WRITE_EXTERNAL_STORAGE" />

    <application

    ...

    </application>
</manifest>
# components > SetupProfile.js
import {useNavigation, useRoute} from '@react-navigation/core';
import React, {useState} from 'react';
import {
  Image,
  Pressable,
  StyleSheet,
  View,
  Platform,
  ActivityIndicator,
} from 'react-native';
import {signOut} from '../lib/auth';
import {createUser} from '../lib/users';
import BorderedInput from './BorderedInput';
import CustomButton from './CustomButton';
import {useUserContext} from '../contexts/UserContext';
import {launchImageLibrary} from 'react-native-image-picker';
import storage from '@react-native-firebase/storage';

function SetupProfile() {
  const [displayName, setDisplayName] = useState('');
  const navigation = useNavigation();
  const {setUser} = useUserContext();
  const {params} = useRoute();
  const {uid} = params || {};

  const [response, setResponse] = useState(null);
  const [loading, setLoading] = useState(false);

  const onSubmit = async () => {
    setLoading(true);

    let photoURL = null;

    if (response) {
      const asset = response.assets[0];
      const extension = asset.fileName.split('.').pop(); // 확장자 추출
      const reference = storage().ref(`/profile/${uid}.${extension}`);

      if (Platform.OS === 'android') {
        await reference.putString(asset.base64, 'base64', {
          contentType: asset.type,
        });
      } else {
        await reference.putFile(asset.uri);
      }
      photoURL = response ? await reference.getDownloadURL() : null;
    }

    const user = {
      id: uid,
      displayName,
      photoURL,
    };

    createUser(user);
    setUser(user);
  };

  const onCancel = () => {
    signOut();
    navigation.goBack();
  };

  const onSelectImage = () => {
    launchImageLibrary(
      {
        mediaType: 'photo',
        maxWidth: 512,
        maxHeight: 512,
        // android의 경우 uri에서 직접 파일을 읽는 과정에서 권한 오류가 발생 할 수 있기 때문에 설정
        includeBase64: Platform.OS === 'android',
      },
      res => {
        if (res.didCancel) {
          //취소했을 경우
          return;
        }
        // console.log(res);
        setResponse(res);
      },
    );
  };

  return (
    <View style={styles.block}>
      <Pressable onPress={onSelectImage}>
        <Image
          style={styles.circle}
          source={
            response
              ? {uri: response?.assets[0].uri}
              : require('../assets/user.png')
          }
        />
      </Pressable>
      <View style={styles.form}>
        <BorderedInput
          placeholder="닉네임"
          value={displayName}
          onChangeText={setDisplayName}
          onSubmitEditing={onSubmit}
          returnKeyType="next"
        />
        {loading ? (
          <ActivityIndicator size={32} color="#6200ee" style={styles.spinner} />
        ) : (
          <View style={styles.buttons}>
            <CustomButton title="다음" onPress={onSubmit} hasMarginbottom />
            <CustomButton title="취소" onPress={onCancel} theme="secondary" />
          </View>
        )}
      </View>
    </View>
  );
}

const styles = StyleSheet.create({
  block: {
    alignItems: 'center',
    marginTop: 24,
    paddingHorizontal: 16,
    width: '100%',
  },
  circle: {
    backgroundColor: '#cdcdcd',
    borderRadius: 64,
    width: 128,
    height: 128,
  },
  form: {
    marginTop: 16,
    width: '100%',
  },
  buttons: {
    marginTop: 48,
  },
});

export default SetupProfile;
# ios > PublicGalleryBocoder > Info.plist
<?xml version="1.0" encoding="UTF-8"?>
<!DOCTYPE plist PUBLIC "-//Apple//DTD PLIST 1.0//EN" "http://www.apple.com/DTDs/PropertyList-1.0.dtd">
<plist version="1.0">
<dict>

	...

	<key>NSPhotoLibraryUsageDescription</key>
	<string>$(PRODUCT_NAME) would like access to your photo gallery</string>
	<key>NSCameraUsageDescription</key>
	<string>$(PRODUCT_NAME) would like to use your camera</string>
	<key>NSPhotoLibraryAddUsageDescription</key>
	<string>$(PRODUCT_NAME) would like to save photos to your photo gallery</string>
</dict>
</plist>
# screens > MainTab.js
import React from 'react';
import {Image, StyleSheet, Text, View} from 'react-native';
import {useUserContext} from '../contexts/UserContext';

function MainTab() {
  const {user} = useUserContext();
  return (
    <View style={styles.block}>
      {user.photoURL && (
        <Image
          source={{uri: user.photoURL}}
          style={{width: 128, height: 128, marginBottom: 16}}
          resizeMode="cover"
        />
      )}
      <Text style={styles.text}>Hello, {user.displayName}</Text>
    </View>
  );
}

const styles = StyleSheet.create({
  block: {
    flex: 1,
    alignItems: 'center',
    justifyContent: 'center',
  },
  text: {
    fontSize: 24,
  },
});

export default MainTab;
'React Native > React Native_study' 카테고리의 다른 글
| [리액트 네이티브를 다루는 기술 #21] 9장 Firebase로 사진 공유 앱 만들기2 (p .511 ~ 528) (0) | 2022.03.23 |
|---|---|
| [리액트 네이티브를 다루는 기술 #20] 9장 Firebase로 사진 공유 앱 만들기2 (p .479 ~ 510) (0) | 2022.03.21 |
| [리액트 네이티브를 다루는 기술 #18] 8장 Firebase로 사진 공유 앱 만들기1 (p .453 ~ 465) (0) | 2022.02.18 |
| [리액트 네이티브를 다루는 기술 #17] 8장 Firebase로 사진 공유 앱 만들기1 (p .445 ~ 452) (0) | 2022.02.15 |
| [리액트 네이티브를 다루는 기술 #16] 8장 Firebase로 사진 공유 앱 만들기1 (p .419 ~ 444) (0) | 2022.01.26 |